You may want to implement AMP to boost the Page Speed. Here’s why
A fast loading website is in-friggin’-dispensable. The human attention span is in a downward spiral – no one wants to wait, especially if they are on a mobile device.
How fast do we need to be? Google recommends a page load time of less than two seconds.
There are many popular measures across on-page and technical domains of SEO that help you meet the goal.
However, one of those measures – Setting up Accelerated Mobile Pages (AMP) for the mobile version of a website – is used sparingly.
Why? In a nutshell, going AMP takes a fair bit of time, effort, and funds depending on how big a website is. In the end, it may not even be worth it.
Is it worth it for you to invest in AMP? If the answer is yes, this post will help you with a step-by-step process of effectively setting up AMP for your WordPress website.
Implement AMP Step 1: Choose the right plugin
Plugin options
WordPress offers many plugins for AMP. I have tried a few of them with success to varying degrees. One of them gave marvelous results in the Google Pagespeed Insights for a while. But it broke all my AMP pages on mobile!
My recommendation
I would recommend the AMP for WP – Accelerated Mobile Pages – WordPress plugin. This plugin provides a lot of options to customize mobile webpages. The rest of the post will be about setting up AMP for your website using this plugin.
After you install and activate the plugin, the WordPress dashboard will show the option of opening the AMP version of your website. You will also see the new plugin (AMP) as highlighted in the below image.

As in the image above, you will see a set of options, we will cover each of them one-by-one.
Lets jump into the settings.
Implement AMP Step 2: Basic setup of the plugin
Website type

Select the option that best represents your business. Select ‘other’ if nothing else matches, you will get an option to type in your website type after that.
Where do you need to implement AMP?

Select where you want to implement AMP. When you go for AMP, you are deciding to keep your mobile web pages almost completely HTML. You need to let go of the CSS/JS codes that reduce the load speed.
The downside to that is, the user experience (UX) gets impacted. For instance, you can no longer have a call-to-action (CTA) button that swivels to attract a visitor’s attention. AMP cuts out that code, thus saving on page load time. This may eventually result in a reduced engagement rate.
In the above list, you may want to choose to have AMP on your pages, or posts, or both.
Design and presentation
Here, you can Setup Your Logo, the recommended size is 120 x 90 pixels. I would recommend not using the logo as it adds to page load time. If no logo is updated on this panel, the AMP page will only have the website name in place of the logo.
The Global Color Scheme option will help you pick a color for your AMP pages that appears on the CTA links on the page, and on the footer link.
For instance, I chose light blue as my Global Color, as seen in the image below.
Analytics tracking
In this option panel, you can enable the tools that you use for tracking. For instance, you can enable Google Analytics by adding the Tracking ID. This way data from the AMP pages will get updated directly in your Google Analytics account.
Similarly, you can add multiple other tracking tools as listed in the image above.
Privacy settings

The Cookie Notice Bar enables you to seek consent from visitors for the cookies you are using on the website. In the below image, the dialogue box in black is a cookie notice bar.

Image Source – Monster Insights
If you or your audience base is from a GDPR country, you need to turn on the settings for GDPR – General Data Protection Regulation.
Please note, if you have to choose, you can choose only one of the two options, not both.
Advertisement

In this segment, choose where you want to position your Advertisements. You can customize as per need – you can have Ads published sitewide or on single posts, or headers among other options.

You can choose the Ad type, Ad size, and Data Ad Client and Data Ad Slot from the Adsense Ad Code.
3rd party compatibility
The last entity captures the list of plugins that you need AMP compatibility for.
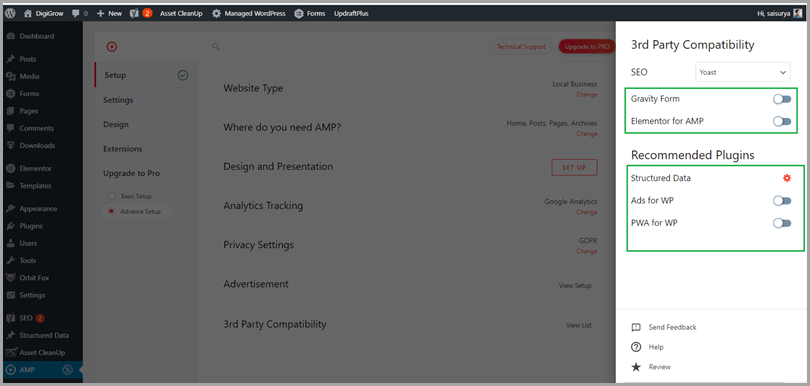
Gravity Form and Elementor for AMP require you to pay for extensions. Structured Data, Ads for WP, and PWA for WP are free plugins. The last three shall be covered in a bit more detail later in the post.
Implement AMP Step 3: More AMP settings
General Settings


The General tab covers the options we covered in the basic set-up. In addition, you get to choose if you want to have AMP on archives, category, and tags pages.
Enabling the last option – AMP Takeover (Beta) – will cause your desktop and mobile version to be the same. This means, your desktop version will also have AMP pages.
I would recommend keeping this option off. Page load is usually better on desktop than on mobile. Having AMP on desktop means trading off UX for a small increment in Page speed. Not a good bargain.
Advertisement
This section has the same options as the Advertisement section in the basic setup.
SEO

If you choose to turn on Meta Description, the text you fill in the Head Section will be picked up by Google. This will be different from the text you filled in for the desktop version. I would recommend keeping the setting off, and keeping the Meta Description consistent across the two versions.
OpenGraph Metadata tags are snippets of code that control how URLs are displayed when shared on social media. This section is visible for the desktop version when you are setting up Title and Metadata in your SEO plugin. Below is an example of the Yoast SEO plugin.

You can find it by going to the Editor section of any post or page, scroll to the bottom. Once you see the section for Yoast, click on the ‘Social’ tab, then you can choose the social media platform of choice.
The AMP plugin allows you to select the SEO plugin of choice on the same option panel. In the above example, Yoast is the plugin chosen. All the data you enter into Yoast for the Desktop version gets copied into the AMP version.

You will see the option to Remove Paginated Pages Indexing and URL Inspection Tool Compatibility.
Paginated pages should be indexed but only as canonical. I would recommend keeping this setting off.
URL Inspection Tool Compatibility fosters a more transparent search for you. It provides detailed reports on crawl, index and serving information in your Google Search Console account. I would recommend keeping it turned on.
Elementor Support

The option of AMPforWP PageBuilder will let you build individual pages for the AMP version, different from the desktop version. It is useful when you want to have slightly different text or CTA for AMP pages.
For example, if you have a ‘Contact Us’ CTA for desktop but you would rather the mobile visitors to call you, you can activate this option and create a separate page.
PWA

As per AMP for WP Plugin’s description – Progressive Web Apps (PWA) transforms your website into a web application and gives visitors a native mobile app-like experience.
It is a design enhancement. Activating the module is a matter of choice.
Performance

The Performance panel delves deeper into page speed optimization.
It enables you to Minify CSS/JS to reduce bandwidth usage without impacting UX or functionality. Leverage Browser Cache enables you to speed up load time for returning visitors. I would recommend keeping both the options turned on.
Enabling Optimize CSS will trigger the tree shaking feature of optimizing CSS. You can keep it turned on in case you don’t have a different plugin that already does that job.
Analytics, Structured Data, Notice Bar and GDPR
These sections have the same options as those covered in the basic setup.
Push Notifications

In case you want to set-up push notifications, you can opt for one among OneSignal, iZooto and Truepush.
In the above example, I have selected OneSignal. However, for any selection, you will see a section to enter the APP ID, an option to enable push notifications for Pages. In addition, you need to choose where you want to position the notification (bottom of the page for example), and what text you want to display.
Contact Forms

This enables you to choose one of the 3 plugins to optimize AMP for – Contact Form 7, Gravity Forms, and Ninja Forms.
All three require you to pay for an extension. In case your CTA is focused mainly on forms, it is prudent to invest in the extension.
Comments

This screen lets you choose where you want the user-generated comments to show on your website. You can also choose the sources to display comments from.
Choose the settings that work best for you.
Instant Articles

Instant Articles is a feature on the Facebook App for mobile users that lets you host your website articles.
The benefit of turning this feature on is an even faster load time compared to having the same article on your website. Since the article loads within the App, you get up to 10 times faster load speed.
However, since the content stays on Facebook, you might lose out on some website traffic. It’s a trade-off between page-speed and website traffic. I would recommend keeping it off.
If you choose to keep it on, you will see the below settings.


After entering your Facebook Page ID, you can customize the article settings. A setting that requires more explanation is – Crawler Ingestion.
When the link of your article hosted on your website gets shared on Facebook, Facebook crawlers look for the ia:markup_url tag. If it’s present, Facebook ingests your article and creates an instant article on your Facebook page.
Tools

The Individual AMP Page option lets you choose if you want to show the AMP pages by default or not. When you choose Show by Default, all your pages will show the AMP version. However, you can choose to hide AMP for individual posts or pages.
To do that, go to any page and click on Edit Page. In the Settings tab toward the right, you can find the option of turning it off.

Similarly, you can choose to Hide the AMP versions for selected categories and posts.
Query Monitor is the developer tools panel for WordPress. If you are a developer, who needs to see the queries on the page, you should keep the setting turned on.
Advance Settings

The Advance Settings option panel has a host of settings most of which are self-explanatory.
I would recommend keeping the default settings turned on unless you are a WP developer or have hired an expert to design your website.
eCommerce

If you own an online store, you can customize your AMP version for WooCommerce. If you primarily sell digital assets, you can turn on the Easy Digital Downloads Support option. Both the options require you to enable a paid extension.
Translation Panel

This panel enables you to select the right translations for a commonly used set of words into the language of your choice.
For instance, you need to type in the translation for the View Non-AMP Version suited to your audience.
For multilingual translations, you can turn on the Use POT file method of Translation. POT (Portable Object Template) file is a template for the PO files. They are plain text files that contain the translations. Each language has its own file extension. For instance French has po.fr.
Implement AMP Step 4: Design
Themes

Just like for the desktop version of your website, you can pick a theme for the AMP version.
There are four free options to choose from.
- Swift
- Design One
- Design Two
- And, Design Three
In addition, every page and post has a section that enables you to create your own design.
Here’s how you can find it. Go to the page or post, and click on ‘Edit Page’ in the top toolbar. Scroll down to see the below screen.

If you select the Use Builder checkbox, the template you create will be shown, if not, the free template you select will be shown.
In case you are building your own template, you have the below modules to choose from.

Remember, AMP is basically an HTML page. You can not get much customization or fancy buttons.
Please note: You have to select a theme. The plugin needs it to pick icons and structure – even when you create your own design. You can go into more details in this step as you implement AMP.
Global
This option panel lets you customize your AMP version.

You can select the colors of choice as above. In addition, you can select Google Fonts. However, I would recommend keeping it off as Google Fonts increase the load time, defeating the purpose of AMP.

Further on, you can choose to keep Sidebar and Infinite Scroll on if that’s what you want your webpage to look like. However, from a page speed perspective, you should keep it off.
The Font Icon Library will be the same as the theme you had chosen at the beginning of the Design panel.
Header

The Header options panel, lets you decide the layout of your header and how your navigation menu should look.

It also lets you add a Call Now Button. It’s a useful button for mobile users.

You may choose to show your Non-AMP link in the Header. However, if your audience is not technically SEO oriented, they may not click on the link.
You can also enable the Search bar. It’s beneficial if you have a blogging website.

The Advanced Header Option enables you to get more specific with your header section settings. It’s a matter of choice. However, keep in mind not to add to the code, as it will negatively impact the page load speed.
Homepage, Single, Footer, Page, Social Sharing, Date and Misc
These option panels, just like the header, are completely a matter of design choice. You can choose any settings that suit you the best.
Summing up
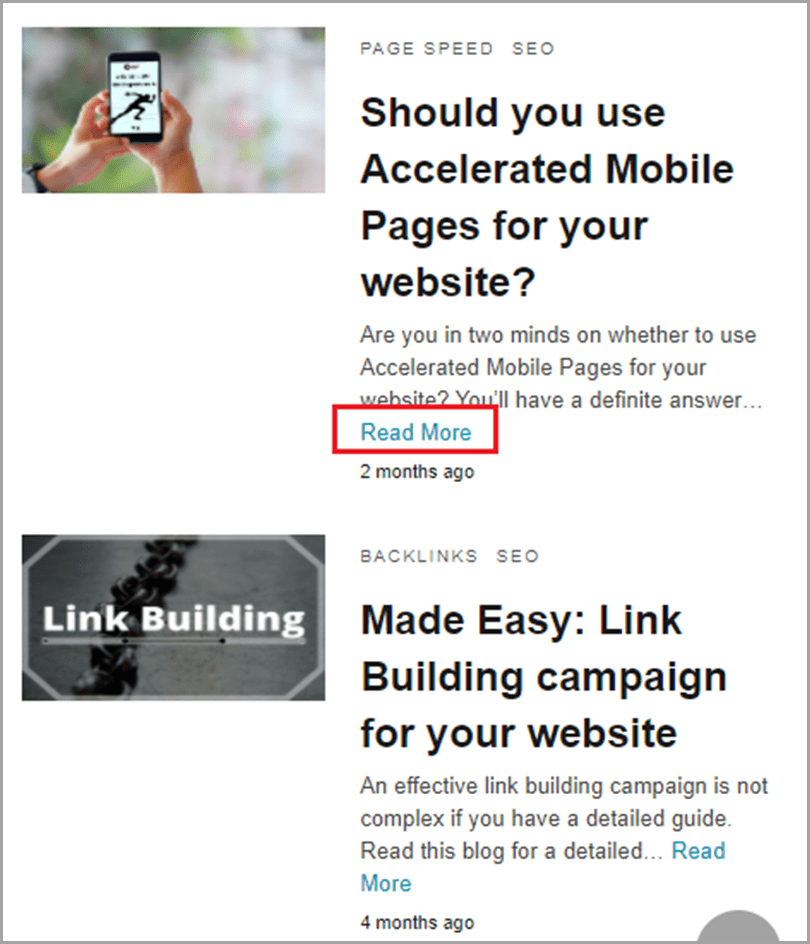
The above steps will help you implement AMP effectively on your website. Once you have saved the changes, check out the AMP version on your phone, or, by appending ‘/amp’ after the URL.
The below images capture the features of your AMP page.
AMG PAGE VISUAL

FOOTER

There you have it. Follow these steps to implement AMP, and to have error free, superfast pages that load in less than 2 seconds for mobile phone visitors.